Pages

Friday, December 16, 2016

Graphic Design Reflection 2016

What did I do this semester?

Raccoon

Our first Illustrator project was to follow a tutorial to create a raccoon, and then make the raccoon our own by adding various different decorations and accents. Then, we incorporated our raccoon into a postcard. This took a couple weeks to complete since learning Illustrator takes a while, and designing a post card can take a lot of time and effort. Sometimes when I was using certain pathfinder tools, Illustrator just wouldn't cooperate, and I would have to find some other way around. Along the way I learned how to use a bunch of different Illustrator tools, such as path finder tools and warp effects. My peers told me that they really liked my post card, and that it was really cute. Eventually, though, I had to change the background because when it came back from being printed it was too light and it was hard to see some of the other things on the card. Overall I'm really proud of the work I did on my raccoon, and it's one of my favorite projects

Vector Portait Challenge

After we had completed our self portrait vectors, we were told to choose another person or animal that we liked, and then we had to create a vector portrait of whatever we chose. I chose a shiba inu, because they're one of my favorite dog breeds. This took my a couple days since by then I had figured out how to use Illustrator, and it was also a small project. One of my biggest challenges was getting all of the "polygons" lined up so there weren't any see-through spots on the dog. Along the way I learned how to create "low-poly" pictures in Illustrator. My friends told me that they thought it was super cute, and when I put it on another art website it became pretty popular for a little bit. I had to change some of the "polygons" since they weren't shaped like try polygons if you looked close enough, and that was bothering me. This is probably one of my best works in graphic design this year, and I'm really proud of it.

How did I use my time in class?

In class I really tried to maximize the amount of time I had in class, since there was so much to do with certain projects. I would often stay past the bell just to finish up whatever I was working on. If I finished a project early, we often had options for extra credit, so I would work on those projects. Outside of class I managed to get Illustrator at home and I really like messing around with Illustrator at home.

What are my strengths and weaknesses?

Strengths

I think that overall I'm really good at getting to work on my projects and finishing on time, and if I don't finish it on time, then I work hard to get it done as quickly as possible. I also feel like I learn quickly, and if you give me something new to do then I'll have no trouble picking it up.

Weaknesses

I often have a hard time coming up with inspiration. Almost all of my projects use the same or similar color scheme, and I feel like I could expand my horizons a little bit.

Summary

What did I love most about the semester?

I really loved just getting to use Illustrator more than I did last year. Last year I barely even got to learn how to use Illustrator, but now I know how to use it effectively.

What would I change?

I would probably change the amount of tutorials we had to do. Our teacher didn't really teach us anything, but she had us look at tutorials instead. I feel like if we had more time of our teacher actually teaching us, then our class might have done even better this semester.

Biggest take-away from the semester?

I learned a lot about project management this semester. I usually get really distracted when working on projects in other classes, but recently I've found that I've been able to just sit down and work better.

My goal for next semester.

My biggest goal is to be able to expand my design horizons. As I previously mentioned, most of my projects involve the same color schemes, and I'd like to change that.

Final thoughts.

I just feel like I've been really productive this semester. I'm super proud of everything I've done, and I've learned a lot along the way.

Animation Portfolio Reflection 2016

Worm

One of the first projects we made in animation was using the puppet pin tool in After Effects. What we did was first draw a worm in Photoshop, and then import the image into After Effects. Then we used the puppet pin tool to apply spots where the worm could move, and used key frames to make it look like it was moving. I picked this project because it was the project that really taught me how after effects works with the key frames and such. I feel like I did a really good job on drawing the worm in Photoshop, but I could have done a better job on where I placed the puppet pins, because at some points in the animation the worm does some weird stuff with his body. With what I learned for this projects I'm probably going to try and use the puppet pin tool more, since I don't really use it that often. I really like this project because I like what I made the worm look like.


Walk Cycle

When we made our walk cycles I learned how to time animations and how to set up key frames for a walk cycle. I picked this project because I'm really proud of my characters design and the background. I feel like I did a lot of work on my character's design. I probably could have made her less stiff though, since she doesn't move a lot. I'm going to apply more walk cycles to my animations with what I learned when making this animation. This is probably one of my favorite projects, just because of my characters design and how much work I put into the whole animation.


Hammer

After we were done with After Effects, we started using Maya. The hammer wasn't my first Maya project, but it was probably our first major one. Here we learned how to use the multi cut tool and the extrude tool by making our hammer's head and the part that comes out on the back. I picked this project because even though it was stressful, I was really proud of what I had made in the end. My greatest strength with this project was probably making the nails, since I didn't have any instructions on how to make the nails; I just did it on my own. With what I learned here I'm able to use the extrude and multi cut tools more easily since I know how they work now.


Ice cream

When we made our ice cream, the only really new thing we learned was how to add bump maps to our materials, which adds a sense of depth and texture to your objects. We also learned how to animate in Maya, but that was pretty easy as it uses key frames just like After Effects did. We put the bump maps on the ice cream and the cones. For a while my bump maps would move awkwardly while it spun, so I needed to figure out how to make them spin with the rest of the objects. I feel like I could have done something to make the lighting better, since it's really dark in my scene. 


Pen

Our most recent project, and also part of our final, was to model the pen we were using to take notes in class. Luckily, I had a pretty easy pen to model. When I was making my pen, I didn't really learn anything new, since we were using skills we had already learned, but I may have figured out easier ways to do certain things. I picked this project because it's probably the thing I'm most proud of from this semester. I think I did a really good job on making the pen proportionate to what it looks like in real life, but I feel like I could have done a better job on making the clip part of the cap. Making this pen has really helped me be more independent in Maya, since we didn't have a tutorial or anything on how to make a pen, since we all had different pens.

Sunday, December 11, 2016

Artificial Intelligence Generated Animation

A critique of this article by Selina Cheng.

Recently, famed animator Hayao Miyazaki was shown an animation which was generated through artificial intelligence. The animation showed strange movements, some of which had "zombies" crawling across floors in grotesque ways. Miyazaki expressed extreme discomfort and disappointment when he remembered a friend who has a disability, and has problems simply trying to give high-fives. He believes that this form of animation is "an insult to life itself" and that the people who created it have no idea what true pain is.

My thoughts

Cheng believes that Miyazaki's reaction isn't that surprising, as many of his works display characters with a lot of depth to them, abd are based on
"progressive themes like war, environmental issues and feminism".

Cheng's article is short and to the point. The issue- Miyazaki's opinions on AI animation- is clear. The article, however, lacks much of a conclusion other than stating Miyazaki's plans for coming out of retirement. Cheng also didn't seem to take a side on the matter, and only displayed Miyazaki's thoughts. The fact that Cheng doesn't think Miyazaki's reaction is surprising may mean that she agrees with him, and finds his opinions easy to understand.

I feel as though Miyazaki's thoughts should be taken into consideration. He did have a very extreme reaction, but the point he made of his disabled friend is important, and people should be careful when they create AI programs.

Conclusion 

Cheng's article helped shed some light on Miyazaki's thoughts. Though without the inclusion of the video, the article might have not made much sense.


Saturday, December 10, 2016

Potion Shop Review

Potion Shop

Potion shop is a thesis film by Temmie Chang. While Chang did the animation, she had the help of many others, including Toby Fox, who composed the original piece playing in the background of the animation. Chang's animation tells the story of a cat who runs a potion shop, but seems to be having issues getting any business until she saves the day by driving off a young dragon. Though all seems well, it is not, and the cat goes to make amends with the dragon, and in the process make new friends. The story is told through great character design and personality, talented animation and an expressive soundtrack.

Thoughts

The first thing that really stands out to me about this short film is the colors. The colors Chang decided to use really fit well with the given situation, and when the plot turns darker, the colors follow suit. On my next project this is something I would like to try and use, as I thought it really brought out parts of the story.

I also noticed that Chang used a multi-plane when showing the town at the beginning of the story to give depth to the animation. This is one of the first things we learned in class, and it really helps to show that different parts of the scenery don't all move together, and are further away from one another.

I feel as though when the crowd was shown running up to the cave, Chang could have improved that bit by animating the crowd a little more than just having them as a mass of color moving towards the cave. This is something I noticed is common in American animation, and it may have been an issue with time since Chang seemed to imply that this took a while to make in the description of the film.

Conclusion

Overall, I thought that this short film was super cute, and really well told. The colors and design were appealing to the eye, the soundtrack was fantastic, and the story was interesting. Chang's other work seems to all be really well made too, and I'm excited to see more from her.

Thursday, December 8, 2016

How to create an insect/arachnid walk cycle in After Effects

Creating a walk cycle for a creature with more than two legs may seem difficult, but its as simple as making a human walk cycle, with just a few extra steps.

1, Have a creature with 6 or 8 legs

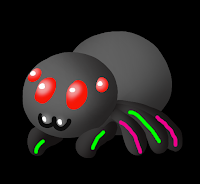
I will be using my spider from my story animation. I know my spider looks like it has only 5 legs but that's because the other 3 legs are behind the rest of the body, so I decided not to show them. It doesn't really matter if it has 6 or 8 legs, because the middle pair of legs will just be able to move on its own. I have highlighted the legs that will eventually be paired together, since arachnids and insects legs move like human legs, but in pairs.

2, Pairing the legs

The legs can be paired together using the whip tool in After Effects. Drag the whip tool from the middle green leg to the front green leg, and the back pink leg to the middle pink leg. Now when you set up your key frames on the first and second legs, all of the other legs will follow.

3, Key frames

The key frames on a walk cycle make the shape of a "D" on its side when looking at the path. Create a key frame where the first leg is moved to the right a bit, then another with the leg moved up and to the left, then another with the leg moved down on the same plane as the first key frame to the left. Copy and paste the first key frame so that  the leg goes back to where it originally was. You now have a full cycle.

4, Copying and pasting key frames

Once you have your key frames for the first set, all you have to do is copy and paste the frames from the first set to the second set, and then move them so that those frames start in the middle of the first frames, so that your legs don't move at the same time. If you make more copies of the frames you can have a longer walk cycle.

5, Watch your walk cycle

Your walk cycle should look similar to mine. Notice that the legs move opposite of each other. I hope this tutorial helped!