Pages

Wednesday, December 16, 2015

My Website

For our final in e9 for first semester, we created a website as a sort of portfolio for our projects! We worked in Dreamweaver with HTML and CSS to create our website. While the website isn't live, it was still fun to make and really interesting to see.

We put our elevator pitch and bio on the first page. The page needed to be readable, so I had to change some colors around to do so.

On the second page we put one of our favorite projects from each strand to show what we do. Then we had to write a little bit about our post. I haven't been in Graphic Design yet, but I'll put something in there eventually!

Thursday, December 10, 2015

e9 Promotional Video


What is this?

Recently in class you project was to make a promotional video for the Freshman class of e9. It was really fun because we got to go film around the school and in other classrooms so we could film friends that weren't in out own class!

What is it meant to do?

This video is meant to be shown to eight graders coming into e-Comm next year, and also their parents at an open house night where eight graders can come to learn about e-Comm. It was meant to be fun, for the eight graders, and informative, for their parents.

What could I have done better?

I feel like I could have gotten a lot more filming done. I had to reuse several clips, making it repetitive. Sometimes I could use different parts of the same clip, making it a little different, but other than that it's not that hard to see.

What do I like about it?

I really tried to edit the video to the voice over that goes along with it. Some parts acted kind of as a queue to start a new clip that fit with what our narrator was saying, which really helped edit it.

What's next?

This is likely our last project in the video strand of e9 for the year, and I will be moving on to graphic design soon. Video was really great because filming was a fun way to see the school, and editing was cool because we got to mess around with music and make a video that meant something.

Sunday, November 22, 2015

Chase Scene Video


What is this?

Our most recent project in video class was to create a chase scene using the 6-shot system and it had to be between 60 and 90 seconds long. I chose to make a funny video where a girl was miding her own business and happened upon a horse. The girl was scared, and ran away. The horse chases after the girl because it want to be friends, but the girl keeps running. Eventually the horse cuts the girl off and they shake hands. The girl then betrays the horse, but the horse gets its revenge...

What did my classmates have to say?

I was given critiques by my classmates. I was told that the music really helped the story be told throughout the video. Relaxed music in the beginning, up-beat cheery music during the chase, and so on. The music fit what was happening.

Plot twist!

Most people were not expecting the girl to reel back and punch her new found friend. This helped give the story a more dramatic feeling, which was amplified as the horse scrambled up to get its revenge.

Wow, that's a long scene.

My classmates also mentioned that the scene where the chase made its way up the stairs was very long. I agree with this, and to fix this I could have filmed that scene in several parts, one at the bottom, and another in the middle of the staircase.

What do I think of my work?

I am quite proud of my work on this project. Yes, it could have been better, but for my first project, I thought it was well done. I had a partner who used the same film as me (we were told to do this) and she did an excellent job as well. I think our class is well taught, and that we all do good work. 


Friday, October 30, 2015

Animal Personality Test

Today in class we did a personality test where we had four rows with ten different characteristics each. In those four rows, we had to rank each characteristic from a one to a four, four being most like you, and one being the least like you.

My results

 I got a 34 in the third row. I'm very sensitive, and calm. I like routine, and dislike change. I try to avoid confrontation whenever possible. I'm not a very social person, and like to keep a routine of the things I do.


What does this mean?

This means that I am a golden retriever! I'm good at making friends, and very loyal. I don't like big changes, and look for security. I can be very sensitive, and caring. I have deep relationships, but only a few close friends. I want to be loved by everyone, and I look for appreciation. I work well in a limited situation with a steady work pattern.


My strengths:

I'm accommodating, calm, and affirming.

My weaknesses:

I'm indecisive, indifferent, unable to express emotion, and too soft on others.

My limitations:

I see the need to be more assertive, and I hold others accountable.

Thursday, October 29, 2015

MBTI Personality Test

In class we were told to take the Myer Briggs personality test. The result I got was INTJ.

How I feel about the results


I feel like this represents me pretty well. I'm pretty introverted, but not to the point where I can't go outside. I tend to think about the true reason for something happening. I really like to think about things, rather than depend on feelings, and I tend to judge situations pretty well. This helps me understand a little better why I act the way I do, since I was a little confused before.

How does this affect me?

This helps show how I act in large groups of people. I tend to dislike being a leader, but I really do think about what's going on. I might give suggestions to the leader, but I won't do the leading myself. People have thought I don't do much because I'm so quiet, but really I'm thinking, and judging situations all the time.

What have I learned?


There are many different types of one personality. There isn't just a black and white introvert or extrovert. An extrovert can still be quiet, but enjoy being around people. An introvert can be loud, but like less crowded settings. Personality is a rainbow.

Thursday, October 22, 2015

The 6-Shot System

What is it?

The 6-Shot System is a way of deciding what to take a shot of when creating a video. Having these shots can really help viewers know what is happening in a video, and what your subject is doing. Without these, the video might be somewhat vague, and will be lacking in story.

Types of shots used

The 6 different shots you want you use are: close up of the hands, close up of the face, a medium shot, a wide shot, an over the shoulder shot, and an extra wide.They do not need to be shown in this order. Each of these will be explained below with a picture to provide and example.

Close up of the hands


A close up of the hands is used to show detail in what your subject is working on. What tools are they using? How do they use them? These questions are typically answered with a close up of the hands.

Medium shot


A medium shot can be used to show the subject, and their project. While other shots are good for just showing the subject, or just their work, this one is good for bringing everything together in an understandable way. This shot should be taken from the hips up.

Wide shot 


Wide shots are used to show the subject from head to toe. They show who the subject is, and a little bit of what they're working on.

Over the shoulder 


And over the shoulder shot is not intended to really show how the subject looks, but the subject's head and shoulder should frame the photo, as shown above. This can be used to see what they're working on with a view over their shoulder as if you were standing right behind them.

Extreme wide shot 


An extreme wide shot should give a view of the subjects working environment! The subject can still be seen, but they're not the main part of this shot. Everything around them is the main part! Sometimes you can see other people working in this shot as well.

Close up of the face 


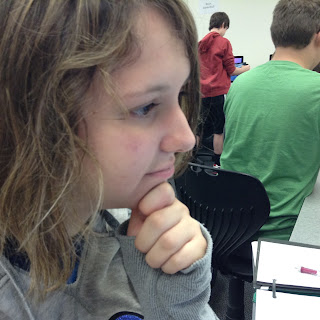
A close up of the face is used to show the emotion of your subject. How do they feel about what they'r working on? What are their thoughts. In this picture, my subject looked like she was thinking, but not wracking her brain trying to figure something out.

Now what?

Now that you know the 6 different shots typically used in making videos, it could be easy to make a video of your own now. Be creative! Keep in mind that you don't have to use these in any particular order.

Tuesday, October 13, 2015

"They Loved your GPA, then they saw your Tweets": A Summary of an Article by Natasha Singer

A summary

This article had very good information about how colleges handle their students activities online. Most students dislike the idea of having their school looking at their Twitter or Facebook, but this article made some very good points.

Why are schools doing this?

Many schools across the nation are going through their students personal Facebooks, Twitters, and other forms of social media looking for bad content. Schools that do this would rather keep their good reputation by not having rude kids on the internet as a part of their school.

As of now, only about 31 percent of schools are doing this, and about 30 percent who do said they found bad content on their student's personal accounts.

Professors and Deans alike believe that a student's posts online really show who they are, and if they have been posting things they'd rather not have their professors see, then maybe they shouldn't be in their school.

Why should you have anything to hide?

Students online already shouldn't be posting rude comments about their peers, yet they do. They feel like the internet is a sort of mask or shield that can hide them from the consequences of their actions.

If a student isn't let into a prestigious school because they talked trash about another student on their Facebook, then good for them. Punishment for your wrongdoings.

If a student gets into a college because they know how to properly use social media, then good for them too. You have self control over what you post.

My thoughts

I believe that the schools who are doing this are doing the right thing. Students should be held responsible for their actions, and not just let in because they had a good GPA. After all, many people care a lot more about how you treat others rather than how smart you happen to be.

I was surprised when I heard that some high schools are teaching students to clean their profiles before applying to a college. That's like teaching them to put on a whole new personality so that others will like them. Like I said earlier, students already shouldn't have much to hide.

Something that had me scratching my head was that some students believe it's unfair for others to be let into a school because of their actions online. What makes it unfair? They're not really being rewarded, they're just let in because they show self control. Students who aren't accepted are turned away because professors know that these students could cause trouble, despite their possibly good GPA.

A few last words

I guess what I'm trying to say is, if you don't already, watch what you post online. You shouldn't have to make a whole separate Facebook to say that someone's ugly or that you just don't like them. If you don't want schools looking at it, then why are you posting it online for the world to see anyway? You are what you post, and schools nowadays recognize this. 

Thursday, October 8, 2015

3D House Model

Our most recent project in Animation was to create a 3D model of a house in SketchUp, and then animate a camera flying around it. We were to choose a one story house that wasn't to simple, and create it as close as we could to the original.

Tuesday, September 22, 2015

Handwritten Name Animation Tutorial


What am I teaching you?

I will be teaching you how to create an animation of your name being handwritten! This will involve several layers, a frame animation set up, erasing bits of your name, and several different affects being used.

Where to begin?

Start by creating a new file in Photoshop, measuring 600x150 pixels, not inches or whatever else may be an option. Choose a font that you like and type your name rather large in the 600x150 space. You may need to crop the image later to make it fit better.

Rasterizing your type


After you have typed your name and cropped as needed, rasterize the type so it is erasable. To do this, right click the layer, and simply select "rasterize type" so you can erase it. After your text is rasterized, you may begin erasing.

Erasing


Begin erasing your name in a way that is the reverse of writing it out, and each time you erase a bit of your name, create a duplicate of the layer you are currently on and hide the previous layer. I started at the top right start of the "V", because in the english language we tend to write from left to right, but remember: this is going to be like reversing the action of writing out your name! Do not start from the right! Don't forget to duplicate layers and hide the previous layer! It is also VERY important to save after every major step, so if you make a mistake then you can restart from your previous save that you created.

After you have erased it all it should look something...


Like this! It looks like nothing, but remember you have your large number of layers, which will become your frames.

Animating

On the frame animation window, click the little menu on the upper right hand corner of the window, and select make frames from layers. This will create frames from all of your layers. You may need to make the background visible on each frame, and to do this all you need to do is select all the frames, and click the little eye thats on the background layer, and it will be visible on each frame. You may also need to delete some frames, like any blank layers at the end will need to be deleted.


Your Photoshop window should look something like this, with a bunch from layers to the right, and frames on the bottom in the animation timeline. But! Your frames are backwards, and if you play your animation, it will look like you're erasing your name! To fix this, select all your frames, click the little menu we used to make our frames, and select reverse frames, as seen in this image:


Tweening

Now, your animation may seem a little boring, just being written out, and nothing happening at the end. If you would like, you may add some effects to the end of the animation! To do this, select the end layer that is your name completely written out, no erasing done yet. Click the little "fx" button at the bottom of the frames window, and mess around with these effects. I will show you how to do outer glow, for this tutorial.


Mess around with the settings of the outer glow effect, until you get something that looks something like this:

A light glowing around your name! As described by the name of the effect. But you need to animate the effect in so it doesn't just suddenly appear on the last frame. To do this, select the frame with the effect, and then click the little menu on the upper right hand corner of the animation window and select tween, above the reverse frames button we used earlier


Once you have selected that, a window will pop up and have several different options to choose from. I just used these settings. Make sure you're tweening with the previous frame.


This should create 5 new frames between the effect frame, and the frame without the effect, making it look like the effect is fading on to the screen. Don't forget to save after all of this!

Saving


If you would like to save as a .GIF file, then go to file on the upper left corner of the screen, and go down until you find "save for web". Click this and a window will come up.


In this window,  set the preset as "GIF 128 No Dither" and leave everything else as is. The preset will select all the things you need without you needing to do anything. You can preview the animation by selecting the play button in the lower right corner, above the done button. Once you are done setting the preset, click save, and your animation should be saved to whatever folder you chose to save it to. Once it's saved and you have opened it, your animation should look like this:


The End!

You're done! Hopefully you are pleased with your outcome. If you think something might be wrong, then go back to your previous saves and check to make sure you did everything. You might not get everything correct the first time, so keep trying if you don't!


Thursday, September 17, 2015

Animation of My Ten Words


You may have seen the ten words on the right side of my blog. They may seem rather strange, but they were meant to be words that describe me.We recently finished another animation, where we were supposed to animate these ten words and our name. Though this time instead of a frame animation, it was a video animation! Video animations are much different from frame animations. You don't need a frame for every single movement in the animation, but instead you only need a frame for each thing you want to move. You need to create key frames, and between each key frame in the animation, the object will do what you have set it up to do. I think video animations are a bit more confusing than frame animations, but they're both not very difficult to create.

Wednesday, September 2, 2015

Progressing Through E9 Animation


We've started and finished another animation, similar to the previous one. Only this time, it isn't bouncing up and down, it's bouncing from left to right and rolling off the screen! We were told to create an animation of a ball with a smiley face bouncing in an arcing path across our name written in large text at the bottom of the screen. Again, we were told to use squash and stretch to show speed of movement, and to set frames further apart to show the object actually moving faster. This time, since the ball has a face, we were to give it some emotion as it hit the ground, so that its face squashed a little bit, and its eyes closed. Another thing we did, was give something for the ball to do once it was done bouncing. It could have faded into the background, bounced up off-screen, or rolled away, like mine did. Anything to get the ball off screen would work. This was done to make the animation loop more smoothly, rather that abruptly stopping and starting at the top again, with no explanation as to how it got there. I believe that I've improved since my last animation, and that my squashing and stretching on my last animation was a little too exaggerated. This time I tried not to overuse squash and stretch, which I think I succeeded at.

Wednesday, August 26, 2015

My First Animation!

Over the past two days we learned how to animate in photoshop. With what we learned, we created our first animation: a bouncing ball!

We were taught how to make the ball appear to go faster, by setting the ball further apart in each frame, and how to make the bouncing seem more realistic, by stretching it vertically as it falls down and comes back up, and squashing it as it hits the ground.


Sunday, August 23, 2015

Squash and Stretch


Squash and stretch is the first principle of animation, and is used to show weight and give flexibility to an animation.

It can be used in something as simple as a bouncing ball, or it can be used to make human facial expressions seem more exaggerated. An important thing to remember about squash and stretch is that the volume of the object doesn't change. If something is squashed vertically, it should become wider horizontally, and if something is stretched vertically, it should become thinner horitontally.

Thursday, August 20, 2015

Hello!

My name is Helen, and I am part of Mr. Olson's e9 Animation class. We were told to create a blog so we could post our work over the next four years, and I am excited to share it with the class, and whoever else might come across my blog.

E-Comm Website:
www.eravens.net